Boatsides
Well I haven't got a lot done since I tore the truck apart in the fall, too many of my other projects detracting me, well that and keeping my vehicles roadworthy as you can see in my Excursion oil pan thread.
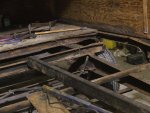
This is what I was working with and since my wheeling was done for the season I decided enough is enough and I have got rid of every remnant of this 23 year old floor.


Nice crack he says, and that is why my rear got cut off as the entire back of the truck was buckling and short of major reconstruction of stuff I did not want, that is why I cut and tubed.....to hold the whole thing together.

I am going at my boatsides a little different than most Cherokee and for that matter other brands and buggies. I do not have huge stanchions holding my sliders in place. I am aiming for a tight triangle which will be strong. and hold the sides of the truck together fairly well. I am planning on running either 1x1 square or angle lengths on the inside for strength and I am going to use 1/4 or 3/8 UHVW or whatever that slippery strong plastic is called bolted to the boatside which is only 3/16". Combined they will be quite strong.
Here is getting them first welded into place. It was extremely ugly because I am welding upside down and sideways and I am pretty lazy and never grind anything down.


And I had a whole bunch of plug welds that I finished welding in for a smooth frame rail.........tedious.


Well after all the welding and then grinding and then welding and then grinding I finally figured out where to get the welder dialed in to do a good job for the next side.
You can't really tell because of the glare but it is smooth everywhere and besides it is getting plastic on it anyway.


And to those of you that know my garage.......

Wow! That only took me about 30 hrs of cleaning, while drinking of course though. Note on the left......steel stand...
Well I haven't got a lot done since I tore the truck apart in the fall, too many of my other projects detracting me, well that and keeping my vehicles roadworthy as you can see in my Excursion oil pan thread.
This is what I was working with and since my wheeling was done for the season I decided enough is enough and I have got rid of every remnant of this 23 year old floor.
Nice crack he says, and that is why my rear got cut off as the entire back of the truck was buckling and short of major reconstruction of stuff I did not want, that is why I cut and tubed.....to hold the whole thing together.
I am going at my boatsides a little different than most Cherokee and for that matter other brands and buggies. I do not have huge stanchions holding my sliders in place. I am aiming for a tight triangle which will be strong. and hold the sides of the truck together fairly well. I am planning on running either 1x1 square or angle lengths on the inside for strength and I am going to use 1/4 or 3/8 UHVW or whatever that slippery strong plastic is called bolted to the boatside which is only 3/16". Combined they will be quite strong.
Here is getting them first welded into place. It was extremely ugly because I am welding upside down and sideways and I am pretty lazy and never grind anything down.
And I had a whole bunch of plug welds that I finished welding in for a smooth frame rail.........tedious.
Well after all the welding and then grinding and then welding and then grinding I finally figured out where to get the welder dialed in to do a good job for the next side.
You can't really tell because of the glare but it is smooth everywhere and besides it is getting plastic on it anyway.
And to those of you that know my garage.......
Wow! That only took me about 30 hrs of cleaning, while drinking of course though. Note on the left......steel stand...
Last edited:
")