Family runner

junkpile

Well-known member
I figured I'd post this repair because I've seen this question brought up a few times before.

A few months back I noticed the faint smell of fuel while standing beside my ol'runner which led me to discover the rotten sending unit lines which led me to discover the lack of an aftermarket replacement part... which led me to a product called "Seal-all" which "repaired" my crusty sending unit until yesterday.
So I decided I'd better fix it properly before blowing my pressure line somewhere other than home.

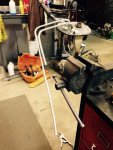
I dropped the tank and pulled out the crusty unit which after snapping the pressure line off looked like this, (yikes!)
ImageUploadedByTapatalk1449666682.307218.jpg
Gave it a quick sand blasting, ground down the nub past the original solder and removed the line,
ImageUploadedByTapatalk1449666926.240775.jpg
ImageUploadedByTapatalk1449666997.454196.jpg
Cut a new piece of 5/16" line and performed half a double flare,
ImageUploadedByTapatalk1449667130.053346.jpg
Threaded it through the hole and silver soldered it in place, and repeated the procedure for the rotten 1/4" return line. Unfortunately I didn't have any 5/8" tubing so I just repaired the filler vent tube. The results should last a good while,
 

Attachments

  • ImageUploadedByTapatalk1449667317.450288.jpg
    ImageUploadedByTapatalk1449667317.450288.jpg
    305.3 KB · Views: 40
Last edited:

junkpile

Well-known member
My goal this aft is to eke out another winters use from these seemingly never ending KM2's.
Before,
 

Attachments

  • ImageUploadedByTapatalk1449773901.608513.jpg
    ImageUploadedByTapatalk1449773901.608513.jpg
    369 KB · Views: 32

junkpile

Well-known member
I think it had 318,000kms when I installed them and it's at 402,000kms now, so approximately 84,000kms lol
 

Conestoga

Well-known member
How do you like them in the winter? Do much hwy driving in freezing rain/slush/snow? Going to have to get myself a groover...
 

junkpile

Well-known member
This is my daily driver so it sees all driving conditions. I do use 4HI when the roads get slippery. They are by no means an ice tire. When they were new being narrow, soft and deep treaded they worked good in the snow and slush. The individual tread blocks are fairly large so when the shallow original siping wears out they do become quite slippery in the wet, hence the re-grooving. Note that I'm re-grooving only the the original pattern and not going deeper than the tread blocks, so far no additional road noise or balance issues. I know I am pushing my luck running them again this winter... if this winter actually ever arrives.
I do plan to get winter tires, still searching for a good set of used factory 16"x7" steelies or alloys.
 
Last edited:

junkpile

Well-known member
This past weekend saw a little out with old and in with the new, ImageUploadedByTapatalk1453173799.750756.jpg
ImageUploadedByTapatalk1453173832.451275.jpg
replaced my old cracked misfiring, coolant sucking cylinder head with one Hosie&Brown sourced and remanned for me. I also treated her to a new timing chain set complete with new gears and tensioners. Purrs like a kitten again.
 

junkpile

Well-known member
I've been living with the "less than ideal" effects of a maxed out stock rear track bar ever since installing those MJ coils into the rear. The lift was a bit more than I had originally wanted but I've come up with excuses to keep them (; One such excuse is the added load capacity. I had ten big bags of concrete back there this fall and she handled the load nicely. Another excuse is the much needed break over clearance they give to the low slung gas tank. I'm also toying with the idea of losing the stock mid mounted tank and slinging an F-150 tank behind the rear axle. So anyways I thought since I've decided to keep these coils in there I might as well modify the track bar to match. I rummaged around in the shed and came up with two TJ rear track bars and a front recall tie rod from a ram 3500. Interestingly enough the ID of the tie rod is only slightly larger than the OD of the track bars.
I started by lowering the frame side track bar mount by slicing it and moving it down 2".
ImageUploadedByTapatalk1453308168.120747.jpg
Then with the axle centered I measured the track bar length which I then made by butt welding and sleeving the two TJ track bars together.
ImageUploadedByTapatalk1453308202.870005.jpg
I'm pretty happy with the much improved ride and centered axle. I might raise the axle side mount at some point to further reduce the ever so slight pendulum action that's still there but really it's so slight that I'll prob leave it alone.
 
Last edited:

junkpile

Well-known member
I need to clean off the bench in the shop and thought I'd post up some sexy head pics complete with crack close ups,[emoji12]

ImageUploadedByTapatalk1453927299.363684.jpg
Cyl3
ImageUploadedByTapatalk1453927340.727934.jpg
Cyl2
ImageUploadedByTapatalk1453927389.343308.jpg
Cyl1
ImageUploadedByTapatalk1453937394.464460.jpg
Cyl4
ImageUploadedByTapatalk1453937449.394604.jpg
 
Last edited:

junkpile

Well-known member
My three year old son is ready to graduate from his crib so he and I brainstormed what he would like his new bed to be, and he chose a Series III 109" Rover! So last week we made a trip to Adams and Kennedy for a few sheets of 3/4" Baltic birch, and got busy building his first truck. I tried to keep it as true to form as possible, lotsa' fun!
ImageUploadedByTapatalk1455491255.830520.jpg
Plans down the road include a safari rack bunk bed
 

Djtc

Well-known member
Good job on the bed Simon. Showed it to my girlfriend and she said you should start selling those! haha
 
Top