Tie a shop rag around the yoke and and I keep the heel of my hand against the ring gear as I turn it. You have not had any pressure on while doing patterns?


|

|

|
You are using an out of date browser. It may not display this or other websites correctly.
You should upgrade or use an alternative browser.
You should upgrade or use an alternative browser.
My "Big Baby" Axle Swap thread
- Thread starter 2Greys
- Start date
Kept the pinion depth at the same point and nailed down the preload using the crush sleeve eliminator which was the spacer plus 0.032. That got me at 14inlbs which is in the acceptable range
I then cleaned off all of the old marking paint and redid a pattern.


Came out a bit clearer. Deep enough?
I then cleaned off all of the old marking paint and redid a pattern.
Came out a bit clearer. Deep enough?
Last edited:
So i figure the gearing pattern is good and havent heard anything bad about my last pattern. Last night i drilled the 7/16 hole and tapped it for the ARB air port. Next step tomorrow is start the Ultimate 88 which looking at the instructions it will probably be a quick process.
Then it is on to building the bracket for the ARB Compressor. I am doing like what Brad had on his old jeep where he had it mounted on the AC Compressor bracket.
So in anticipation of starting tomorrow I pulled all of the stuff out of the box

First thing I will do tomorrow is dirty up my garage by cutting off the ends of the axles back to the shoulders. Since the seals are part of the silver attachments the old parts of the tube that held the seals are no longer needed.
Then it is on to building the bracket for the ARB Compressor. I am doing like what Brad had on his old jeep where he had it mounted on the AC Compressor bracket.
So in anticipation of starting tomorrow I pulled all of the stuff out of the box
First thing I will do tomorrow is dirty up my garage by cutting off the ends of the axles back to the shoulders. Since the seals are part of the silver attachments the old parts of the tube that held the seals are no longer needed.
Last edited:
Had a couple minutes this morning to go out and start on getting the Ultimate 88 installed.
The instructions provided by Yukon are quite good but the first bit in this case is redundant as I already have everything removed from the ends of the axles and the old bearings pulled.
The next step is cutting off the ends of the axles where the bearings sat:

And then grinding it down flush with the shoulder

Side note: I had ordered new Currie adjustables from Savvy and had intended to order a set of new front uppers and both lowers. Somehow I ordered 1 front uppers and 2 rear uppers. I had emailed Gerald at Savvy to try to get it changed before it got shipped. Little did I know he was actually at KOH at the time codriving the Savvy/Currie rig which won the EMC. The fact that he was keeping the business running and responding quick while there is pretty impressive.
The instructions provided by Yukon are quite good but the first bit in this case is redundant as I already have everything removed from the ends of the axles and the old bearings pulled.
The next step is cutting off the ends of the axles where the bearings sat:
And then grinding it down flush with the shoulder
Side note: I had ordered new Currie adjustables from Savvy and had intended to order a set of new front uppers and both lowers. Somehow I ordered 1 front uppers and 2 rear uppers. I had emailed Gerald at Savvy to try to get it changed before it got shipped. Little did I know he was actually at KOH at the time codriving the Savvy/Currie rig which won the EMC. The fact that he was keeping the business running and responding quick while there is pretty impressive.
Last edited:
Once the edges were smoothed down to the shoulder, I put some RTV on the back side of the bearing seats (there is a nice little indent where the shoulder fits in so it should be nice and sealed and tightened it down (note flat side up). It was nice to see RTV ooze out the side between the seat and the axle

I cleaned out the inside of the tube using brake cleaner and an old rag and then mounted the ARB and ran the hose to the hole I had drilled and tapped on Thursday night.

Sorry for the blurryness as it is a little late to take a new one because the diff cover has been RTV'd and mounted:

The diff cover looks washed out due to the satin clear coat and the diff hasn't been done yet since the bracketry needs to be done first so no point.
Next step was to put on the lug bolts which are not pressed but screwed in at 90ftlbs and red locktite. Personally I think they should be pressed but whatever.

After this was done for both shafts I had to press on the bearings. The 12 ton press I bought did it and survived but I suspect a 20 ton would have done it without breaking a sweat. The biggest issue was that the longer shaft was getting interference with the crossmember that attaches both legs of the press and there is very little room to maneuver it. I would do about a 1/4" and then have to raise it all as it was banging against the crossmember. The picture below is the shorter of the two shafts

All pressed on:

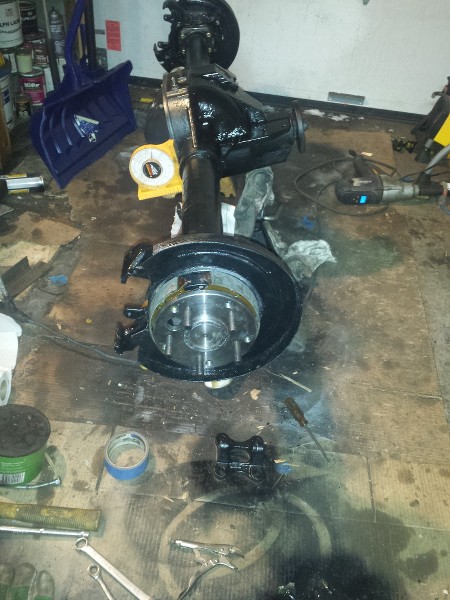
Got the brake brackets and dust shields on and decided to call it a day.

Next up is:
- Get the parking brakes on
- Put in axle shafts and bolt up
- Paint Calipers
- Put on new rotors, calipers and pads
- wait for end of March when it gets warmer and Snow will be gone (denial not just a river in Egypt)
- Get Truss on
- paint
- plumb
- mount
I cleaned out the inside of the tube using brake cleaner and an old rag and then mounted the ARB and ran the hose to the hole I had drilled and tapped on Thursday night.
Sorry for the blurryness as it is a little late to take a new one because the diff cover has been RTV'd and mounted:
The diff cover looks washed out due to the satin clear coat and the diff hasn't been done yet since the bracketry needs to be done first so no point.
Next step was to put on the lug bolts which are not pressed but screwed in at 90ftlbs and red locktite. Personally I think they should be pressed but whatever.
After this was done for both shafts I had to press on the bearings. The 12 ton press I bought did it and survived but I suspect a 20 ton would have done it without breaking a sweat. The biggest issue was that the longer shaft was getting interference with the crossmember that attaches both legs of the press and there is very little room to maneuver it. I would do about a 1/4" and then have to raise it all as it was banging against the crossmember. The picture below is the shorter of the two shafts
All pressed on:
Got the brake brackets and dust shields on and decided to call it a day.
Next up is:
- Get the parking brakes on
- Put in axle shafts and bolt up
- Paint Calipers
- Put on new rotors, calipers and pads
- wait for end of March when it gets warmer and Snow will be gone (denial not just a river in Egypt)
- Get Truss on
- paint
- plumb
- mount
K
KBjeep
Guest
What are you using for brake cables?
K
KBjeep
Guest
I was told two explorer drivers side cables work but you have to shorten the adjuster end. I got them free so ill try it first.
Looking good :beer:
Last edited:
Thanks!
I don't like to think of them as bad boys, more like ornery with a bad disposition
I got the parking brake pads on with only one skinned knuckle.
Lesson learned, before putting the diff cover make sure the axleshafts will go in. Right now I can get the passenger side shaft in about 2 inches shy of bottoming out. Can't tell right now with the cover on if this is an interference issue with the ARB or if maybe the bearings need to get pressed on tighter.
Since I have very little left to do until spring there is no rush so I will open it back up.
Last edited:
To catch up I was having issues getting the passenger side axleshaft in as it seemed to be binding on something. I had got it in after some wailing on it with a light deadblow hammer but couldn't get it back out.
Using a slide hammer the passenger side came out with two easy taps. I then ground back a bit of the dustshield and it made a huge difference. I was able to get it back on. Interesting part is that driver side was a lot easier to get on.
Anyways I got the shaft on far enough that I could thread on the nuts and torque to 40ftlbs. I used gear grease to hold the spacer in place so I didn't have to fight with that.
Picture below you can see the hole at 10 oclock through the shaft and one of the nuts used to pull it all together

I also pulled out one of the rotors to make sure there was no interference between the rotor and the dustshield as the shields had been warped a bit dragging the axle out from under the donor vehicle.

So for the next 6 weeks at least it is going to have to sit as I am going to put the axle under the jeep and get the truss placed right. However I am tempted rather than wasting the next six weeks doing nothing to basically set the axle at the same pinion angle as the Dana 35 and weld on the Artec Truss and then use the adjustable arms I am getting on Monday to dial it in. The only thing I can do between now and then is build the bracket for my ARB compressor
Using a slide hammer the passenger side came out with two easy taps. I then ground back a bit of the dustshield and it made a huge difference. I was able to get it back on. Interesting part is that driver side was a lot easier to get on.
Anyways I got the shaft on far enough that I could thread on the nuts and torque to 40ftlbs. I used gear grease to hold the spacer in place so I didn't have to fight with that.
Picture below you can see the hole at 10 oclock through the shaft and one of the nuts used to pull it all together
I also pulled out one of the rotors to make sure there was no interference between the rotor and the dustshield as the shields had been warped a bit dragging the axle out from under the donor vehicle.
So for the next 6 weeks at least it is going to have to sit as I am going to put the axle under the jeep and get the truss placed right. However I am tempted rather than wasting the next six weeks doing nothing to basically set the axle at the same pinion angle as the Dana 35 and weld on the Artec Truss and then use the adjustable arms I am getting on Monday to dial it in. The only thing I can do between now and then is build the bracket for my ARB compressor
So I got almost all that I need for my axle swap. To make sure I am not waiting for anything when the snow stops flying and the birds come back North I ordered everything I have to have to do the swap.
Got the following today
Starting off with the non 8.8 related
New CB, Speedo gear, and Tire inflation kit for the ARB (sorry it is blurry).

Last 5 years I have gone through 2 Uniden 520s and figure it is time for a change. The last one came with flaws. I took it to a local company and they looked at it and said it was obviously defective as it had a lot of cold solder joints. They were able to fix it. One of the disadvantages of crossborder shopping. It gets cheaper to buy than to ship south again.
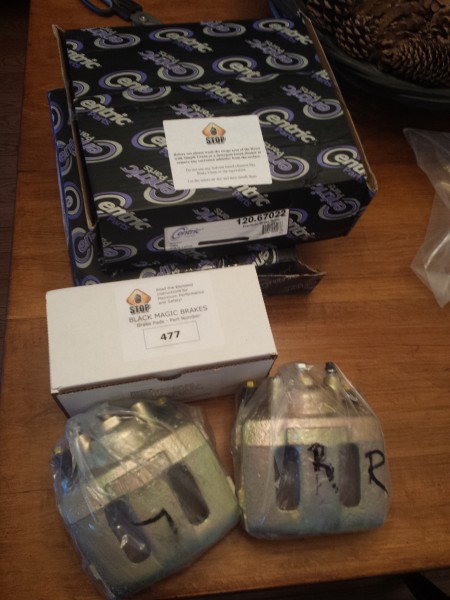
BlackMagic pads, new calipers and Centric rotors for the HPDana 30
New nutserts as at least the front driver one has become sketchy. I can't get it to torque. I also picked up new washers for the new front LCA brackets. These deal with the caster slot so I don't need to deal with cam bolts. They also help with what's below to keep the grease in with the greasable bolts:

2 new Adjustable upper front control Arms and both lowers. Got these from Savvy. Wife was disappointed as the box did not have any lip smackers. I suspect they fell out in shipment as the box had split from the weight. That and it looked like it had been used as the base of a pile at some point

No Jeep they are not for you (silly dog)

Got the following today
Starting off with the non 8.8 related
New CB, Speedo gear, and Tire inflation kit for the ARB (sorry it is blurry).
Last 5 years I have gone through 2 Uniden 520s and figure it is time for a change. The last one came with flaws. I took it to a local company and they looked at it and said it was obviously defective as it had a lot of cold solder joints. They were able to fix it. One of the disadvantages of crossborder shopping. It gets cheaper to buy than to ship south again.
BlackMagic pads, new calipers and Centric rotors for the HPDana 30
New nutserts as at least the front driver one has become sketchy. I can't get it to torque. I also picked up new washers for the new front LCA brackets. These deal with the caster slot so I don't need to deal with cam bolts. They also help with what's below to keep the grease in with the greasable bolts:
2 new Adjustable upper front control Arms and both lowers. Got these from Savvy. Wife was disappointed as the box did not have any lip smackers. I suspect they fell out in shipment as the box had split from the weight. That and it looked like it had been used as the base of a pile at some point
No Jeep they are not for you (silly dog)
Heads up: I blew a speaker on the Cobra 75, don't crank it.
Also, I found my antenna wire had split in a number of places, that would explain why it cut out so much.
Also, I found my antenna wire had split in a number of places, that would explain why it cut out so much.
So I started working on the bracket for my ARB Air Compressor. My plan is to mount it on the existing AC bracket since I don't have AC. The bolts on it are in a 4x5 pattern while the bracket the ARB came with is much smaller. I figured I will make plate with the holes in the right spot and then make a mount identical to the one that came with it. I don't think the existing one will fit easily between the AC bracket bolt holes which is why I started making the new brackets.

I have some spare steel lying around from building my front and rear bumpers so no cost other than time. Wifey is not impressed since the smell permeates through the house and especially our master bedroom since it is right above the garage. And of course I decided to do this when she went to bed. Behold my angle grinder skillz and weep in despair. It ain't pretty but it should work
I have some spare steel lying around from building my front and rear bumpers so no cost other than time. Wifey is not impressed since the smell permeates through the house and especially our master bedroom since it is right above the garage. And of course I decided to do this when she went to bed.
Behold my angle grinder skillz and weep in despair. It ain't pretty but it should work
Last edited:
Weather was warm enough I went out and got an idea on the size of the plate I will need to fit on the AC Bracket for my ARB Compressor. Planning this weekend to fab it up. Need to get some steel plate though as it is wider than anything I have.
My evening ended on a very happy note when I saw this link
http://ca.movies.yahoo.com/video/trailer-park-boys-3-dont-151606499.html
My evening ended on a very happy note when I saw this link
http://ca.movies.yahoo.com/video/trailer-park-boys-3-dont-151606499.html