Project -XJ Evolution

G

Grumpy

Guest
I need to build door bars (beside seat bars whatever they are), Adrian told me for comp they have to be closed to a certain height for competition though that is not in my plans right now. What I am wondering is what do you like/dislike about your own bars? Adrians is farther forward for his feet to slide in. What is the required (recommended) height and does anybody recommend at least some sort of low point for ease of entry.

dj

I may be a little late with this reply but here it is if you care.......in no way designed for comp, it was for comfort first with a *little* side protection......I think the only complaint i have with it is the attachment point to the roll bar is too high and when I put my arm over while driving it's a little uncomfortable in the armpit area....lol.
 

Attachments

  • S 064..jpg
    S 064..jpg
    127.9 KB · Views: 23
  • S 070..jpg
    S 070..jpg
    134.5 KB · Views: 22
Last edited:

Farm Boy

Bought the Farm
Oh for those of you didn't see it at the meeting this is the DOM less 5 sticks Marek already took and 1 I used. Plus there is almost 200' of CREW still out on the trailer.

Holy Fawk Batman! :eek: Are you building a cage for the bus??? 16 sticks on the floor plus the one you used @21' each (or are they 24'?) is 357' of DOM plus the 200' CREW. Tell me you've got something else in mind and you're not "planning ahead" for screwing things up. :flipoff:
 

dwcjwerfner

Well-known member
Club Member


Sometimes (alot) Connie says it seems like I am going backwards. I hate when she is right :banghead:
 

dwcjwerfner

Well-known member
Club Member
Well I didn't want to cut up my good bumper with it's tire carrier, so I took it off. I shortened the XJ another 3" and built a tube bumper. (Well I am almost done :p). Going to be hard to get those back side windows in this short :lmao:


dj
 

Badweld

Well-known member
Keep cutting............The more the better.................No windows, they are going to break when you go on your roof!
 

dwcjwerfner

Well-known member
Club Member
Alright I am moving slow as hell being picky over little details....but I never seem to move fast without a deadline, gawd I wish I would get over that.
Anyway here some picks of actually finishing that bumper. I welded it to checkplate for structural integrity and then I cut a hole through the check and tube and inserted a receiver as I need to move my trailer sometimes when I get somewhere confined or lumpy with the bus.


So here it is in place (like last night) but together, and yes I know some really ugly welds right visible :banghead:
I have to get 2 3/4" tabs made for my D-rings and didn't feel like trying to cut that thick as I did not pick up a blade for the saw yet so I will probably just bring the material into town and hopefully they will me magically ready to pickup tomorrow night.
I also "adjusted" the D-pillar so it is ready to weld on when I decide what angle I need.


dj
 

dwcjwerfner

Well-known member
Club Member
Well this is slow going especially since I didn't get home from a family function until 10:30
I almost wish I would have made the D-ring tabs before I had welded the rest of the bumper together but the shop in town did a really nice job on them and I didn't want to spend all the time it would have taken to build them.

Here is cutting them out and then using the deburr tool to clean up the bottoms to make it fit all the way in......wait maybe I could have made them in this much time, well I was playing with seat location and axle attachment too (stay focussed and do the tedious jobs is my current mantra since I don't have a deadline.....well it is getting close)


But I think all the work was worth it as I was going to skip the D-ring tabs but it is so nice having them on the outside instead of just using the receiver for those times when you really need to pull from the side. I am also going a bit nuts with the bracing as it is a SUV and I still expect it to do extraction duties like pulling full size trucks out ;)
So I believe it is ready to weld on ......after I finish plating the last 18" of frame..... :finger:


dj
 

dwcjwerfner

Well-known member
Club Member
Well I probably shouldn't show this but it might be helpful to somebody to see how to fix messes you find or make :p
Last year when I was in a rush to keep wheeling and the back of my truck was breaking off I cut steel to plate my frame with using some pretty loose parameters (read guestimated by eye and some rough tape measurements thrown in). Anyway I ended up with gaps top (overhang from the old floor was a real problem welding) and bottom as I was welding 1/4" to guage unibody frame and it is pretty fugly too so to ensure strength and look nice I am finishing what I started. I am quite a hoarder and only throw at scraps of metal when they are rusted pieces of crap or really small and I told my wife I would use them someday. :flipoff:

What I am dealing with:


Well it's not beautiful but its "fixed":


dwcjwerfner

Well-known member
Club Member
This is a really big dust pan and that is 95% just ground up metal......getting tired of grinding and cutting


The rear bumper is welded on very well after I finished all the rear plating. It was interesting as I kept hitting the frame with a big hammer after each side was plated and it was amazing to see it go from something "ok" to something "amazingly strong" with really a minimal amount of metal (but lots of weld lol)


Mocking up the passenger side:


Where it's staying:


Tomorrow I will do the other side and then put the C-Pillar in it's place.

dj
 

dwcjwerfner

Well-known member
Club Member
Well tomorrow turnned into Friday night and several hours on Saturday. It is taking so long because I am fighting with 1/8-1/4" variances to make all my idiotic, assinine, WTH was I thinking :banghead: ......I mean really cool bends fit each other and look nice. I actually built a new drivers side rail as the other one was so out of whack from when I made it fit my body line last time.

The good news is I was getting pretty tired and discouraged but I don't know if the pictures do it justice but it is really coming together how I envisioned it and it really makes it worth all the effort :flipoff: .....no really.


dwcjwerfner

Well-known member
Club Member
Well those of you who have helped me know I have been using Bend-Tech Pro which I bought last year. Hmmmmm......what to say, well it allows your average Joe to figure out and bend things that would require lots of practice on simple bends and cuts and then I think you might actually know better and just make things that look cool with simple lines :lmao:
Anyway I know the graph below is for video games but I feel that you could almost add Bend-Tech to it.
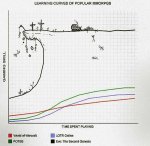
learningcurve..jpg

The main problem I was having how you perceive what is shown in 2D that your brain translates into 3D, you know it's like one of these but add a whole bunch more lines.

Image Perception..jpg

Anyway I should have contacted the company much sooner but I sent them off an email last week and they replied if I could call them (long distance to the US but Connie has an unlimited plan) and they would log me into there computer. After 64 minutes we got pretty well everything sorted out including that the majority of the other problems I was having were addressed in the new release which I could have or just have my money back. Then I sent them my file which had anomalies and corruptions due to the old version and Brandon cleaned everything up and sent it back to me. You know for a software company that is pretty good service.
Nevertheless Friday was not productive on the truck but Saturday and Sunday I finally got something done.

This is one of the cool features of the program which prints a template to put right on the tube with where it should align and it's distance from the end. Once again mileage may vary, I am starting to finally get them right. :p


Here are my B-C top rails. Nope no straight lines there:


Wow I can just put straight bars in, but oh yeah because I cut apart my original back I had built when I shortened the XJ things need to be "pulled" into place, but that is what ratchet straps are for. :flipoff:


Passenger compartment roof bars with the 2 centre ones being for a place to mount a console. So these are actually nice straight tubes......that attach to tubes that are not straight at all so they were still time consuming :banghead:




 
D

dan_the_man

Guest
Holy crap, Dwayne, I wish I had half your patience. That tube is looking sharp.
 
Top