My "Big Baby" Axle Swap thread

2Greys

Insert title here
Club Member
Planning on siphoning the gas and using it in the Liberty to drop the weight on it. Told Anne that she has been conscripted to guide the filler neck up when I put it back in.

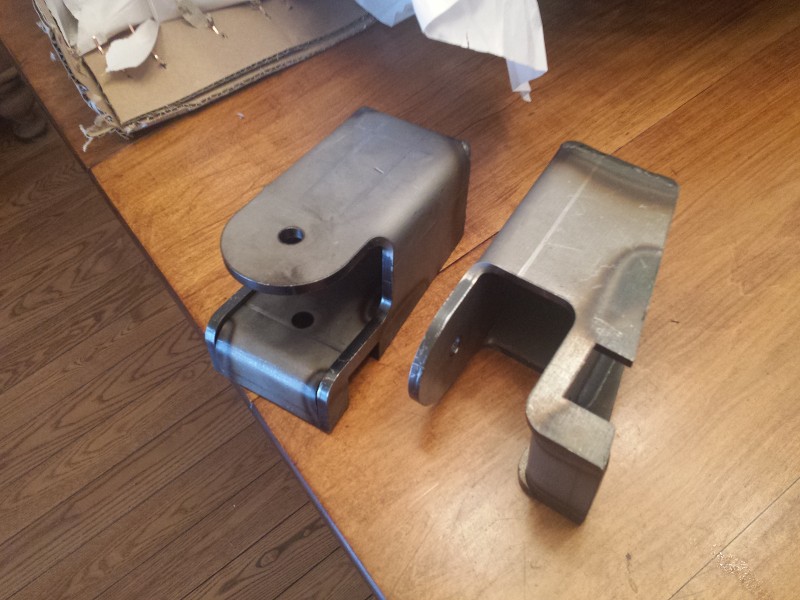
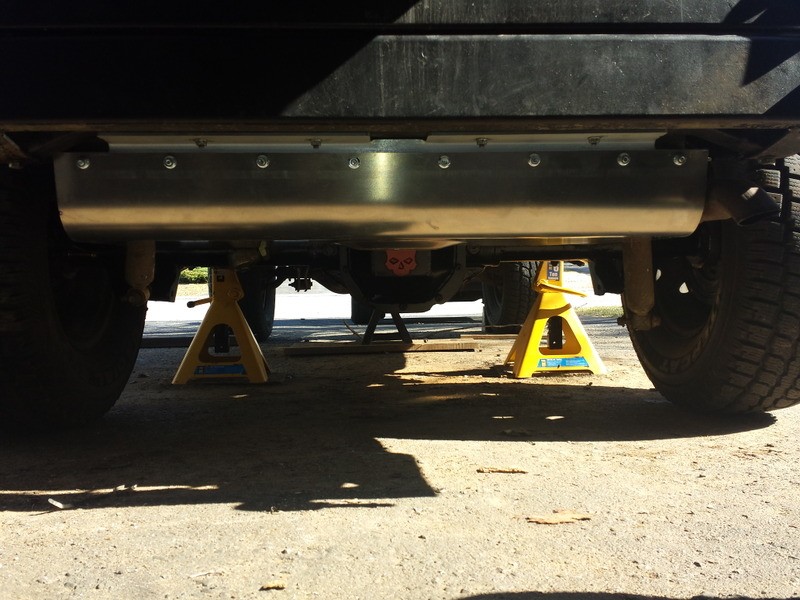
Pulled it this afternoon and it went so fast that after dinner I proceeded to chop off the old brackets


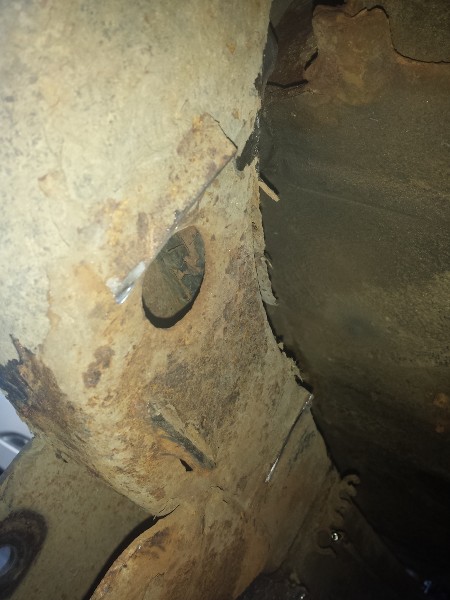
Above is the driver side. Suprisingly the steel is pretty much still there. Still going to stab at it tomorrow and weld in some replacement steel.

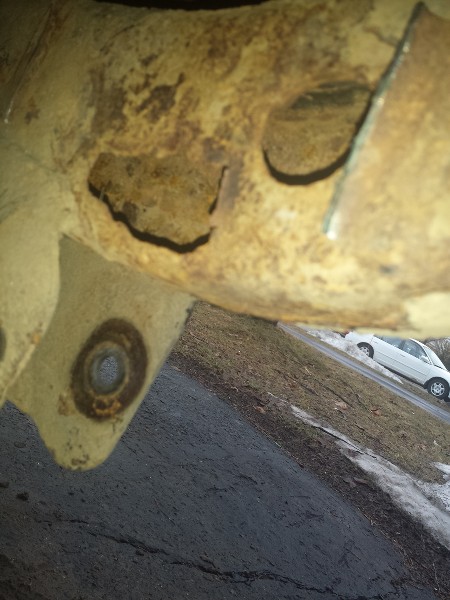
Passenger side was not as nice. The thing with that hole was how the bracket ripped itself off. I am going to have to see if I can get the muffler disconnected from the cat. The clamp that is there is seriously rusted on so obviously will need to be replaced.

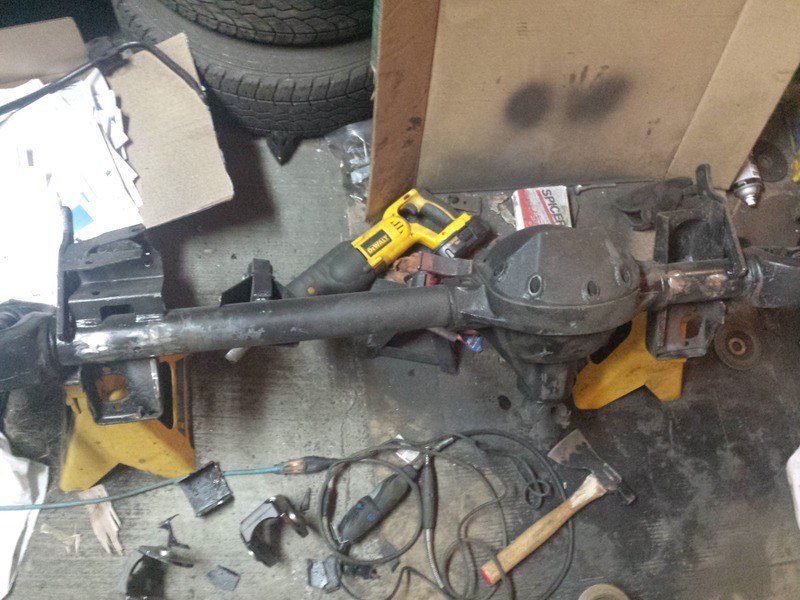
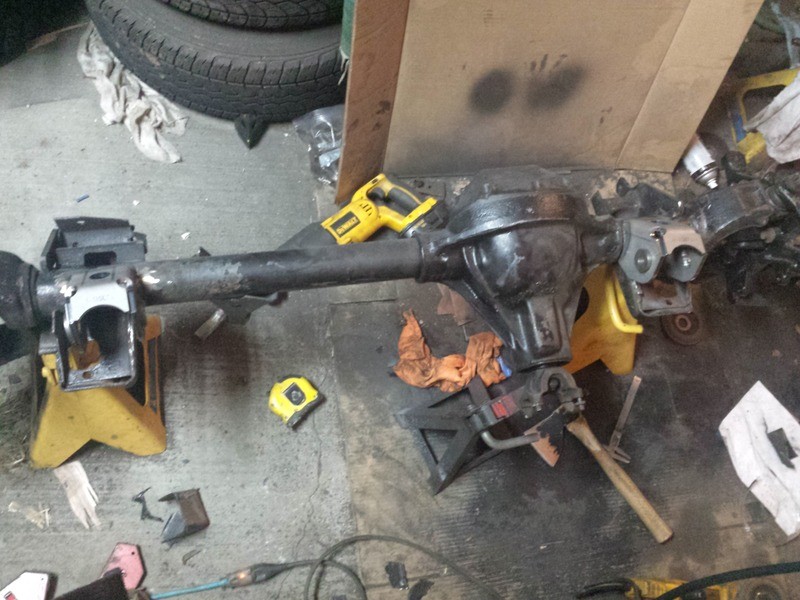
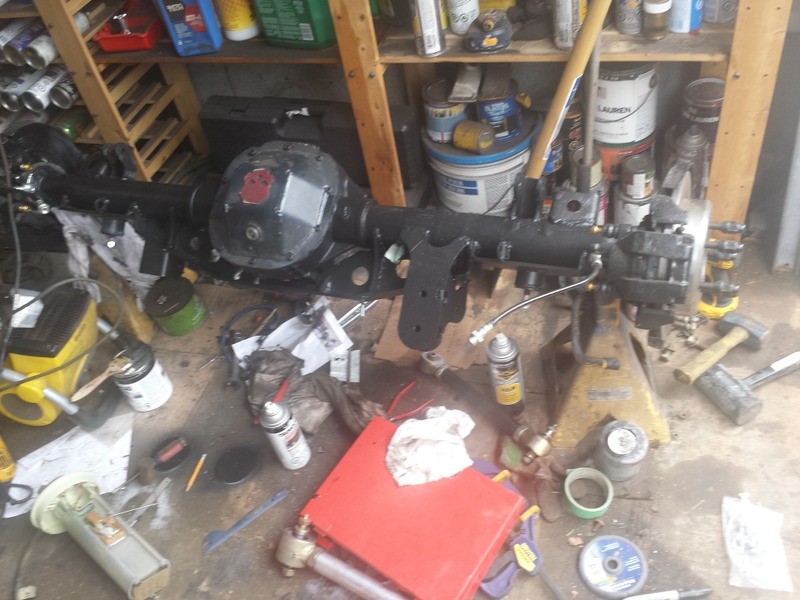
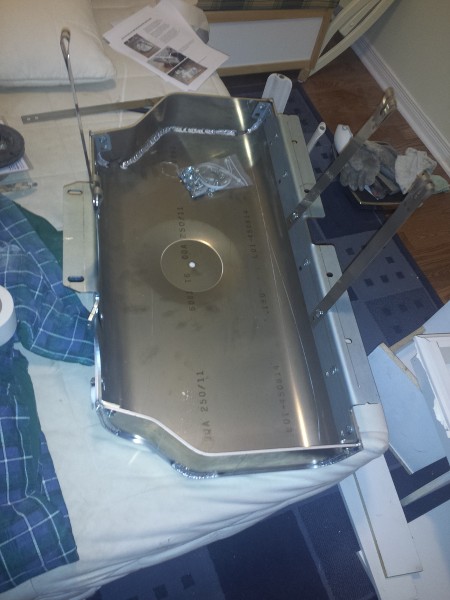
Had a couple minutes this evening and got the Gas Tank skid together. Decided to go with having it at its highest height since I have a Body Lift already (almost like it was planned or something...)


Brad, You wouldn't happen to have a strap wrench that is big enough to loosen the fuel pump ring would you? PM me.
 
Last edited:

bradleyfitz

Well-known member
Club Member
No, I don't. There's a specific tool for it. I used a flat head screwdriver and a hammer. You just tap it along the ridges until it loosens up.
 

2Greys

Insert title here
Club Member
So Rusty's doesn't have that great of a name in the states. I can kind of see why. I ordered the Upper Control Arm brackets from them. I just got the box. Yeah it was a track bar frame mount not what I needed. They are supposed to be sending me the right thing so we will be seeing how long this takes....
 

2Greys

Insert title here
Club Member
Got underneath and cleaned up the frame. The driver side really looks ok other than where it tore. I am thinking I might just drill two small holes at each end of the tear and weld it shut. However if it explodes like rusty steel has a tendency to do I will then cut out until I get clean steel.
For the passenger side I tried to get the muffler off but it refuses to budge. I think the two pipes have rust welded together. Suggestions on how to get it off?

So rather than using the angle grinder I have resorted to the trusty dremel. I cut back about a 2.25x 5.5" hole until I got to solid steel. Looks like most of the corrosion was on the bottom portion of the side right by the hole for the UCA nut.

Although I have been one to dissuade people from drilling holes in the bottom of the frame, I am thinking about putting a 1/2" hole and welding a washer around it to reinforce the area to allow drainage. I still think putting a hole is not a great idea but reinforcing it?

I have the passenger side piece of steel roughed out. Just need to grind it down a bit so if fits the hole.

I think I figured out where my knocking at idle is occuring. The bottom plate of the UCF Lo-pro mount is just barely missing the cat. When it is sitting I suspect it rocks enough that it hits it.

Well I got a tracking number for the brackets that were not sent to me and they told me to leave the box out with the track bar bracket tomorrow and UPS will pick it up. So now I wait to see how long it will take to get here

Right now some of the extra stuff to do outside putting the axles under the jeep include

-Replacing at least the front driver nutsert. It was one of the ones I replaced about 5 years ago. I could never torque it up after a year and I figure it is time.

- weld new brackets on
- patch up 3 spots where someone had cut into the frame when the original nutserts failed.
- replace fuel pump
- put gas tank in skid
- drain gas before putting gas tank in skid
- put gas tank back in
- trim back UCF lo-pro bracket that seems to be tapping the cat at idle. Not a horrible thing just a minor annoyance and since I have it off..
- oh and I want to have all of this done by May 1. I think it is possible if the weather and the brackets and joint get here. That reminds me I need to call TMR and nag them about where it is. Not their fault as they are waiting on Currie and I guess they aren't always the fastest...
 

2Greys

Insert title here
Club Member
Well took the opportunity to drain the fuel tank of 30 litres of gas and put it in the liberty. While at it, I replaced the fuel pump. Now the garage reeks although I did it right at the door.
 

2Greys

Insert title here
Club Member
Moved tank over to new skid. Nice and snug. Cleaned up holes that had been cut into frame when original nutserts failed so tomorrow I need to make up the patches for it. Also driver side is going to be cut instead of just welding it. Looked closer at it right above where the LCA mount is seems to be pretty thin so I am going to clean them up. I get the new brackets on Tuesday so I have to have them patched by tomorrow since rain is forecasted for at least Monday and Tuesday. Still can't get the muffler off so I have to use dremel/drill with grinding stones to clean up old brackets on Passenger side. There should be enough room though for the welder to get in there to weld the brackets on.
 

2Greys

Insert title here
Club Member
I got the passenger side hole patched with 3/16 steel but when I went to do the driver side it was blowing out so I ended up cutting out some more and i still have to patch it.

Need some advice
Since the steel in general has thinned out over all What I was thinking was doing (on both sides) is I have a whole bunch 18g and I was going to cut out a couple 4" strips 16" long and lay over the newly patched place to bulk them up. I figured drill a couple holes in the new steel and puddle weld. Is this a good idea? Any suggestions? Idea came for it when Marek reinforced his body a while back. I figure if I place it about 8" each side of the center of where the Upper brackets are supposed to go it should reinforce the area. My fear is that even though I replaced that one spot it may just rip where the the new piece hits the old. Now the new brackets are 1/4" thick steel but I could see the whole thing get ripped off instead. Is 18g thick enough or should I just cut it all out and replace with brand new steel?
Thoughts?
 
Last edited:

junkpile

Well-known member
Don't do it! You can't weld to rust. If it's blowing out it's rust. There is no good coming from sandwiching the rot between a piece of 18 gauge and your patch panel. I also see no point in patching your frame with heavier material than the frame is. Cut out all the rot and replace with like material, 0.120" or 1/8" is probably what your frame is. Once it's properly patched you can plate over (overlapping) the offending area with a piece of 3/16" if you like, to strengthen the repaired area.
My 2¢
 

2Greys

Insert title here
Club Member
Don't do it! You can't weld to rust. If it's blowing out it's rust. There is no good coming from sandwiching the rot between a piece of 18 gauge and your patch panel. I also see no point in patching your frame with heavier material than the frame is. Cut out all the rot and replace with like material, 0.120" or 1/8" is probably what your frame is. Once it's properly patched you can plate over (overlapping) the offending area with a piece of 3/16" if you like, to strengthen the repaired area.
My 2¢

Which is essentially what I did for the passenger side (sorry I should have mentioned that I was talking about doing this on the passenger side not as an alternative to what I did for the passenger but on the driver side. I want to do this on both sides. I was just figuring I could put another piece of 16g (just checked it is 16 not 18) overlapping what I already patched but over a much larger area to reinforce it.
BTW the frame from the factory is 0.150 thick, tad thinner than 3/16".
My concern about doing 3/16" overlap of what is there is it then moves the bracket more toward the center of the body changing the angle that the control arms have with the axle. Not a huge amount but still would.Just trying to thicken it up more towards stock in that specific area.

I just edited the post above but I see the confusion and reworded a bit. When I said inner, I meant on the outer skin of the frame but on the side towards the center of the vehicle.
 
Last edited:

2Greys

Insert title here
Club Member
lols
I measure the thickness of the steel of the frame and it has shed about .020 so it is down to about 0.130. Adding 16g should bring it up to .190 which is about 3/16" thick.
 

2Greys

Insert title here
Club Member
Well finished patching and reinforcing around the area. The new brackets arrive Tuesday so Wednesday I should have them burnt on. The only thing that concerns me is welding the top is going to be a bitch I think I can get in from the bottom but we shall see. Worst case I loosen the tub up (I hope I don't have to. )
 

2Greys

Insert title here
Club Member
Got these today, aweek late but better than never.


If the weather is nice enough tomorrow I will be welding them on. Now I wait for the JJ that TMR is supposed to be getting. Talked to them yesterday and they were going to call Currie to see where the stuff they ordered was. It would be great if I had it before Friday as I could probably get almost everything done but I doubt it. Pretty much that is the only thing that is holding me up. Once I have the JJ I can finish welding the trackbar bracket, finish the plumbing on that side, finish painting it, and put it under the jeep. I actually am wondering if I was to use one of the upper JJ's as a spacer hjust to weld it in, if I could do that I can finish everything else and get it under and wait for the joint, plunk the joint in and then call it complete. Sigh

Since it was snowing earlier (grr) I took the opportunity to cut off the stock brackets of the 30


And put on the new Artec LCA brackets


I always fear that I haven't welded them on thick enough even though it looks good and because I am afraid of warping the tubes.
I took it slow alternating sides and waiting for them to cool off but even then...
 

2Greys

Insert title here
Club Member
Lol Zombies.
I neeeded something to break off the metal after cutting it. It was convenient :D
 

2Greys

Insert title here
Club Member
Yeah I won't be getting the JJ until mid late next week. Ayone got a stock trackbar for a TJ I fan borrow asap? I think that will work for spacing the bracket.
 

2Greys

Insert title here
Club Member
Brackets are on and I put a coat of paint on the top of the 8.8. Decided to try painting by brush. It definitely goes on thicker. Wouldn't do body work with a brush but it should do the trick on the axle/frame. Tomorrow I will put a second coat on and once dry flip it upside down to get the rest.
If everything goes well by end of Monday I will have the jeep on the new axles minus the rear trackbar. And if lucky the arb lockers will be plumbed as well.

Since the JJ has a width of 1.6" I measured it as recommended which is 1.625 and welded the trackbar bracket on.
 

2Greys

Insert title here
Club Member
Gas tank and new savvy skid is in!


One thing I don't recall seeing in the instructions but may be helpful to know is the old bolts had retainers on, for the ones on the rear outer bolts it makes it easier to put on the nuts as they kept being pushed back in.

Rotated the axle 1/3 and put a coat on there. I figure by Monday there will be at least two thick coats on the axle. Good enough to throw it under and wait for the JJ to come in.


Update:
I hooked up the gas and all that and it started! Yay obviously the new fuel pump works.
Also put in the new rear brake hard line. One thing I noticed is the new brackets are taller than the old ones, this is definitely evident with the rear brake line. May have to tweak it a bit.
 
Last edited:

2Greys

Insert title here
Club Member
Got the axle underneath and set the pinion angle without the springs in. I need to do a full stuff test and then put the springs in and confirm everything still looks good.


Needless to say I will need to fix the paint again. Have to thank the wife for helping guide it in. (that's what she said).

Tomorrow I have a feeling will be a wash since I have a 7 mile run to do and the inlaws are coming over.
 
Top